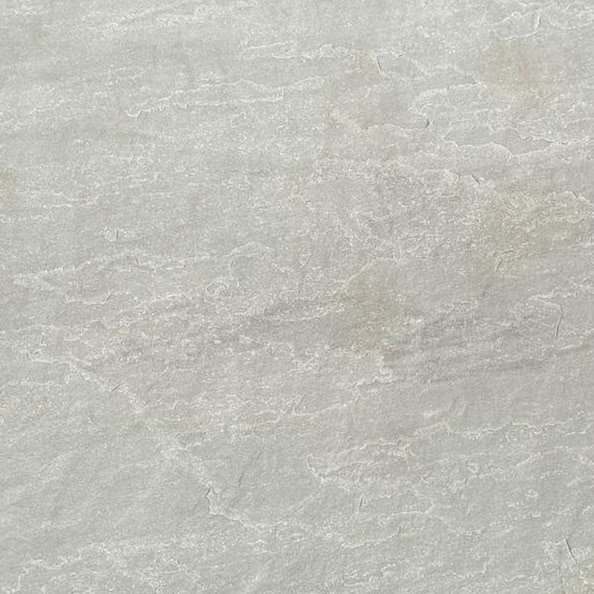
Lake Kandla Grey Vitrified Porcelain Paving
The Key Benefits of lake kandla grey Porcelain Paving:
Low maintenance : It brings joy to know that porcelain paving slabs require minimal maintenance. A quick sweep with a brush will take care of any dirt buildup, and for tougher dirt, simply wiping it with a damp cloth should do the trick.
Anti-slip resistant : Lake Kandla Grey Vitrified Porcelain Paving has anti-slip properties, making it a safe choice for surfaces where liquids like water may be present. This attribute makes Kandla grey porcelain an excellent option for outdoor areas near pools, spas, and water attractions.
Hard-wearing : Our porcelain products undergo a vitrification process that results in solid and durable slabs. Regardless of extreme weather conditions, the quality and appearance of your porcelain paving will remain unchanged.
Durable and long-lasting: The vitrification process ensures that the porcelain slabs are solid and can withstand drastic changes in the weather without affecting their quality or appearance.
Conclusion :
Versatile: Kandla grey colour is a versatile colour that can match with different styles and designs.
Aesthetically pleasing: The porcelain paving adds an attractive touch to any outdoor area, creating a visually appealing space.
Whether you’re looking to create a stunning outdoor patio, add a touch of elegance to your pool area, or simply enhance the look of your outdoor space, Lake Kandla Grey Vitrified Porcelain Paving is a great choice. Its combination of durability, versatility, and style make it a popular option for homeowners and designers alike.

Slip Resistant – Stain Resistant – Frost Proof – Fade Resistant – No Maintenance Required!
Suggestions laying with adhesive on a Screed
1 Apply the adhesive spreading two layers, one on each surface (on the tile and on the foundation).
2 Arrange gaps of 3-5 mm between the tiles using the cross spacers provided for this purposes.
3 Upon completion, clean the surface thoroughly removing all residues of plaster and adhesive.
Suggestions laying dry on Grass
1 Once the positions of the tiles have been decided upon, remove the grassy surface for a depth of about 5 mm.
2 Place a layer of fine gravel or sand in the empty space to level it & stabilise the tile.
3 Position the tile, checking that it is flat and correcting this if necessary
Suggestions laying dry on Gravel and Sand
1 Flatten the surface of the foundation with the help of a leveling bar.
2 Choose the pattern, arranging the tiles on the ground.
3 Position the tiles exactly, using a bar to space them out (or cross spacers if positioned close together) to improve the alignment.
You can also check our related products like Lake Abbey Vitrified Porcelain Paving.


Reviews
There are no reviews yet.